The Battles of Saratoga (19 September and 7 October 1777) marked the climactic end of the Saratoga Campaign during the American Revolutionary War (1775-1783). The battles, which resulted in the surrender of an entire British army, convinced France to enter the war as a United States ally and are therefore considered a major turning point in the American Revolution.

Background
On 20 June 1777, General John Burgoyne led a British army of 8,300 men out of Canada, intent on seizing the Hudson River Valley and capturing Albany, New York. The Hudson River was considered by many to be the key to the American continent, and Burgoyne believed that its capture would allow him to isolate and suppress the New England colonies, thereby cutting the fledgling United States in half. Burgoyne led his army down Lake Champlain to the vital stronghold of Fort Ticonderoga, which the British effortlessly captured on 6 July. After defeating Ticonderoga's fleeing garrison at the Battle of Hubbardton (7 July), the British arrived at Fort Edward, on the Hudson. By this point, Burgoyne felt confident enough to write to Lord George Germain, the British colonial secretary, that he expected New England to fall in a matter of weeks.
Meanwhile, the Northern Department of the American Continental Army scrambled to mount a defense. General Philip Schuyler, who had previously overseen the Northern Department, was blamed for the loss of Ticonderoga and was relieved from command. He was replaced by General Horatio Gates, an ambitious officer who had long been seeking the glory of an independent command. On 3 August, Gates arrived at Stillwater, a small town along the Hudson where the ragtag units of the northern American army had begun to coalesce. Joining Gates at Stillwater were several officers and units who had been sent north by the American commander-in-chief, General George Washington, to aid in the Hudson's defense; these included General Benedict Arnold, a fiery-tempered soldier from Connecticut, as well as the popular New Englander General Benjamin Lincoln, and Virginian Colonel Daniel Morgan, whose Rifle Corps was already noted for its sharpshooting prowess. All told, Gates found approximately 8,500 effective troops at Stillwater.
As Gates' army continued to gather, the British expedition began to falter. On 15 August, nearly 1,000 of Burgoyne's German troops were killed, wounded, or captured by a Vermont militia at the Battle of Bennington. Meanwhile, a secondary British army had failed to capture Fort Stanwix on the Mohawk River and had retreated back into Canada, isolating Burgoyne's primary force. Despite these setbacks, and although his supplies were rapidly dwindling, Burgoyne refused to entertain the possibility of retreat and continued to push toward Albany. Gates, perhaps at Benedict Arnold's instigation, decided to meet this threat head-on and marched his army 10 miles (16 km) north toward the town of Saratoga. On 7 September, Gates' army occupied Bemis Heights, a bluff that sat about 200 feet (60 m) above the river and was covered in dense forests and ragged terrain. Polish engineer Tadeusz Kościuszko oversaw the construction of a series of fortifications atop the heights, which Gates' soldiers sheltered within.

Preparations
On 13 September, Burgoyne's troops began to cross over to the western side of the Hudson near Saratoga, a process that took the 7,000-man army two days. The British knew that the main American army was close; but, since Burgoyne had recently been deserted by his valuable Iroquois scouts, there was no way of knowing exactly how close Gates' forces really were. So, once it had finished crossing the river, Burgoyne's army gingerly resumed its southerly march toward Albany, continuing at a slow pace to avoid running straight into the hidden American army. It would not take long for the Patriots to reveal themselves. Around midday on 18 September, a party of British troops were foraging for potatoes on an abandoned farm when they were fired upon by a patrol of Continental soldiers. The skirmish, though brief, resulted in 20 dead or wounded British soldiers and alerted Burgoyne to the fact that the Continentals were closer than he had thought. Upon further investigation, British scouts were able to roughly identify the American position atop Bemis Heights; realizing that he could not go around the American army, Burgoyne prepared for an attack to take place the next morning.
Burgoyne's plan of attack required his army to be split into three columns. The first column of roughly 1,100 men, led by the German general Baron Friedrich Adolf von Riedesel, would advance along the riverside against the American right flank, while a second British column of 1,100 men, under General James Hamilton, would demonstrate against the American center. These were to be mere diversions; the main British thrust would be carried out by General Simon Fraser, who would lead 2,000 men in a flanking maneuver against the American left. Fraser's attack would, hopefully, catch the Americans off guard, rolling them off the heights and pinning them against the river, where they would be destroyed. At 10 a.m. on 19 September, the firing of a single cannon signaled the three British columns to begin their advances.

Meanwhile, atop Bemis Heights, General Benedict Arnold was growing worried. He knew that the American position was rather strong; the right flank was anchored by the river itself, while the center was protected by the dense woods and the steepness of the bluff. However, the American left flank was relatively vulnerable, and Arnold correctly anticipated that it was here that the British would focus their attack; if the British could flank the American position from the left, Arnold foresaw that the Continentals would become trapped in their own fortifications, helpless against the onslaught of British artillery and musket fire. To prevent the earthworks from becoming their graves, Arnold asked Gates for permission to lead an advance force to Freeman's Farm, about a mile northwest of Bemis Heights. This position, deep in the woods, would render the British artillery useless and would give the Americans an advantage over the British soldiers since they excelled at woodland fighting.
At first, Gates refused Arnold's request; he saw no strategic value in dividing his army and preferred to remain on the defensive, but reports from Patriot scouts made it clear that Arnold had been correct and the British were attempting to outflank the American left. Around noon, Arnold once again asked for permission to create a forward position at Freeman's Farm, and this time, Gates reluctantly agreed. Accompanied by Daniel Morgan's riflemen and Henry Dearborn's light infantry, Arnold set out for Freeman's Farm.
First Battle: Freeman's Farm
Colonel Morgan arrived at the farm first and positioned his sharpshooters at strategic positions so that, when the British first began to emerge from the trees, they would have clear shots; Morgan's riflemen targeted the British officers, marked by their resplendent scarlet coats. The advance party of British troops soon came under fire from the Patriot riflemen and, once nearly all their officers had been hit, began to retreat; Morgan's riflemen pursued, running straight into the muskets of General Fraser's main column. A British musket volley mowed down the American riflemen, sending them running back into the woods.

Following this skirmish, a lull descended on the battle as both sides awaited reinforcements; on the American side, Arnold and Dearborn arrived to reinforce Morgan, while British General Hamilton's column changed course to come to Fraser's aid. At around 1 p.m., the battle resumed. It was fought almost entirely within the space of a 350-yard-long (320 m) clearing; the British troops were positioned along the northern edge of the clearing, with Arnold's troops lined up along the southern edge. For the rest of the afternoon, each side took turns charging across the open field, bayonets fixed, toward the enemy lines. At one point, an American assault, led by Arnold personally, drove the British back and succeeded in capturing several field guns. However, Hamilton rallied his troops and launched a counterattack, driving Arnold back to his original position. The battle continued to seesaw in this way until dusk.
By mid-afternoon, Hamilton had sustained heavy casualties; one of his regiments, the 62nd, had started the day with 350 men and now had only 60 left standing. The bulk of Fraser's column had been unable to find its way onto the battlefield, and Hamilton knew that he could only withstand one or two more Patriot assaults before his line collapsed. General Burgoyne, who had personally arrived on the scene, wrote to Baron Riedesel requesting his immediate assistance; the German general changed course, marching up the bluff from the riverside. Riedesel arrived just in time, reinforcing Hamilton right as his line was on the verge of collapse. This could have been enough to tip the scales of the battle and overwhelm Arnold's force, but luckily for the Americans, the onset of darkness brought an end to the fighting, allowing Arnold's troops to quietly slip back to the safety of Bemis Heights. Although the British controlled the battlefield at the end of the night, they had lost 556 men killed or wounded, compared to 319 losses for the Americans.
Interlude
The Battle of Freeman's Farm (or the First Battle of Saratoga) had been a stalemate, with neither side able to gain the upper hand. Burgoyne, after conferring with his officers, decided not to attack the next day, and instead set up camp only a mile away from the American line. This decision was made because of a letter Burgoyne had received on 13 September from Sir Henry Clinton, commander of the British garrison in New York City. Hoping to take some of the pressure off Burgoyne, Clinton proposed to sail up the Hudson and take the Patriot forts in the New York highlands; this would, hopefully, draw Gates' army off Bemis Heights and allow Burgoyne to continue his march to Albany. Burgoyne decided to trust in Clinton's plan rather than risk his army in another battle and settled down to wait.
In the following few weeks, British and American patrols skirmished almost every day, but no major battle was fought; the Patriots were happy to let Burgoyne wait since every day that passed saw more Americans arriving to join the army. By early October, Gates had at least 12,000 men while Burgoyne's numbers continued to dwindle, as British soldiers died of their wounds or deserted. Burgoyne also received some bad news: American General Benjamin Lincoln and 2,000 Patriot militiamen had retaken Fort Ticonderoga, thereby cutting off the British path of retreat to Canada, before rejoining Gates on Bemis Heights. All of Burgoyne's hopes now rested with Clinton, whose expedition left New York City on 3 October. Clinton got off to a promising start: he seized the Patriot forts Montgomery and Clinton on 6 October and cut the chain across the Hudson River, with some of his forces advancing far enough to burn Kingston, the provisional capital of New York State. But here, Clinton's offensive lost momentum and advanced no further; as the days passed, Burgoyne realized that Clinton was not coming and that he was truly on his own.
Meanwhile, atop Bemis Heights, relations between Arnold and Gates had quickly deteriorated. Arnold blamed Gates for his failure to turn Freeman's Farm into a complete victory, believing that Gates had not provided him with enough troops. Gates, who was jealous of the adoration Arnold received from the men, neglected to mention Arnold's name at all in his official report of the battle to Congress. Arnold went to Gates' tent to confront him about this, leading to a shouting match between the two officers; after Arnold stormed off, Gates stripped him of his command and gave it to General Lincoln.
Second Battle: Bemis Heights
By 6 October, Burgoyne knew he had no choice but to attack: every day he waited, his army became weaker while Gates' army only grew stronger, and it was becoming increasingly unlikely that Clinton would come to his aid. Burgoyne decided to send General Fraser's advance guard to probe the American left flank for weaknesses; if Fraser discovered even a single vulnerability in the American line, Burgoyne planned to attack it with his entire army, in a last, desperate attempt to roll Gates' army off the heights. On the morning of 7 October, Fraser set out, his detachment organized into three neat columns and supported by ten artillery pieces. It moved forward three-quarters of a mile before coming to a halt, waiting as Fraser sent out his scouts to gather intelligence on the American position.
The Americans, however, were aware of the British movements and set out to meet them. Morgan's riflemen were sent to the far left of the British position while Enoch Poor's New Hampshire regulars moved to the right, and General Ebenezer Learned moved in on the center. At 2:30 p.m., Fraser's grenadiers first noticed the Americans through the tree line and fired a volley, but this was ineffective as the grenadiers were out of range. Major John Acland then led the grenadiers forward in a bayonet charge, believing that the mere sight of the towering grenadiers would be enough to send the Americans running. Acland, however, was mistaken; Poor's brigade waited for the grenadiers to come within close range before unleashing a murderous volley. Many of the grenadiers crumpled to the ground including Acland, who was shot in both legs. The grenadiers turned and fled and were closely pursued by Poor's troops.

On the left, Morgan's men swung around and began firing into the British rear; as the redcoats started taking fire from all directions, the British line began to disintegrate. The only thing preventing the line from breaking was Fraser himself, who rode back and forth on his gray horse rallying his men. Burgoyne, upon hearing the roar of battle, sent his aid Sir Francis Clarke with a message for Fraser to immediately withdraw to the British camp, but Clarke was killed before he could deliver his message, and Fraser's men stood their ground.
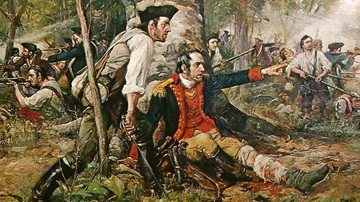
It was around this time that Benedict Arnold arrived on the scene; although he had been removed from command, Arnold had stayed behind to brood in his tent and had rushed off to join the attack when he learned it was happening. Arnold's very presence on the field of battle was enough to rally the Patriots. He noticed the similar effect that Fraser had on the British and told Morgan that "the man on the gray horse…must be disposed of" (Fleming, 67). Morgan had several of his best sharpshooters target Fraser, who was soon mortally wounded by a bullet to the stomach. As soon as Fraser slid off his horse, the British broke ranks and fled, with the Americans in close pursuit.
With Arnold in the lead, the Americans chased the British all the way to the right side of their camp, which was defended by two redoubts: the first was defended by 300 British soldiers under the German Colonel Heinrich von Breymann, while the second was commanded by Lord Balcarres. The Patriots first attacked Lord Balcarres' redoubt, but this fortification was well-defended, and the redoubt held; Arnold, worried that the attack would soon lose its momentum, quickly shifted his focus and led the Patriots in a charge against Breymann's redoubt instead. This proved more successful, as the American troops swarmed into the fortification, resulting in bloody hand-to-hand fighting in which Breymann himself was killed. Just as the redoubt was about to fall into American hands, Arnold was wounded in the leg by a bullet and was carried back to headquarters on a litter. The fall of Breymann's redoubt exposed the main British camp to the Americans, but the onset of darkness put an end to the battle. The British had lost around 900 killed, wounded, or captured in this second battle while the Americans lost only 150 casualties.

Burgoyne's Surrender
The next day, Burgoyne attempted a northerly retreat but was stopped by a sudden storm; instead, he decided to dig in at the town of Saratoga itself, still hoping that Clinton would arrive. Before long, it became apparent that this would not happen, and he entered negotiations with Gates about a surrender. Gates, who had just learned about Clinton's successes in the New York highlands, was worried that Burgoyne might change his mind and was eager to bring about a quick surrender; for this reason, his terms were surprisingly lenient, allowing the British soldiers to return to England in return for a pledge that they would not take up arms against the Americans for the remainder of the war. Burgoyne agreed, and on 17 October 1777, he surrendered his army of 5,800 soldiers as well as his 27 field guns, and all his other weapons and ammunition. Congress, however, found Gates' terms to be unacceptable and instead ordered the surrendered British army to move to Virginia, where it remained in captivity until the end of the war.
The Battles of Saratoga have long been regarded as the turning point in the war. It was the first time an entire British army had surrendered to the Americans, proving to the world that the United States stood an actual chance of winning the war. The battle persuaded the Kingdom of France, which had long been searching for an excuse to attack Britain in revenge for the Seven Years' War (1756-1763) to enter into talks with Congress about an alliance; in early 1778, France officially entered the war as a US ally, shifting the balance of the war to the United States' favor.