The Battle of Isandlwana on 22 January 1879 was the opening encounter of the Anglo-Zulu War and a famous Zulu victory against the British Army. Over 25,000 Zulu warriors attacked and destroyed a British-led force of 1,700 men camped at the foot of the Isandlwana mountain in Southern Africa. The British did recover, won the war in July that year, and ultimately achieved their purpose of expanding and securing total control of Southern Africa.

The British in Southern Africa
Britain controlled the Cape Colony in Southern Africa, which was strategically important because the Cape of Good Hope was a stopping point for ships that connected India and the Far East to Europe. Through the 1830s, when the British outlawed slavery and population growth applied too much pressure to land and resources, around 14,000 Boers (White settlers of Dutch or French ancestry) migrated northwards. The Boers fought both the Ndebele and Zulu peoples to carve out two new territories for themselves: Transvaal and Orange Free State. In 1854, the British recognised these two Boer republics in return for their acknowledgement that they were, theoretically, under British sovereignty. Another British colony was Natal, located along the Indian Ocean coast and created in 1843.
This rather poor corner of the British Empire suddenly became one of the richest when diamonds were discovered in Griqualand in the late 1860s. This region was also made a crown colony in 1871. The British, particularly the new Colonial Secretary Sir Michael Hicks Beach, were keen to unify the British colonies with the two Boer republics into some sort of federation, but the latter were suspicious of what that would mean for their own independence.
Meanwhile, certain African groups were making their last desperate attempt to rid themselves of the colonists. A loss by the Boers to a Pedi attack gave the British the excuse to annex Transvaal in January 1877 and then claim that only a British military presence would guarantee security. The British were still determined to create their federation of Southern Africa, but one serious obstacle remained to the north of Natal: the Zulu Kingdom.

The Zulu Kingdom
The Zulus were originally one clan of the Nguni people who had migrated down into Southern Africa in the 16th century. By the 1820s, the Zulus had built themselves an empire based on a martial culture, where society was strictly divided by age regimentation. The king of the Zulus since 1872 was Chief Cetshwayo kaMpande. The British were wary of a well-organised state so close to their frontiers, but the Zulus had, in fact, shown no signs of hostility to their European neighbours. Both Sir Bartle Frere, governor of the Cape Colony, and Theophilus Shepstone, a key figure in the government of Natal, were keen to hold on to Transvaal, and the bordering Zulu kingdom was seen as a threat to that aim.
Frere and Shepstone sent false reports of the situation in Southern Africa to London. These falsehoods described Cetshwayo as a villainous tyrant, incorrectly stated the Zulus had a permanent standing army, and exaggerated the size of that army. Such exaggerations were necessary to justify a war when the British government was already involved in conflicts elsewhere in the empire, notably the Second Anglo-Afghan War (1878-81). Colonial expansion in Africa seemed to the British government an insignificant and expensive distraction to more important issues elsewhere. Frere well knew this, and he added to his skulduggery by hiding the findings of a commission which had decided in favour of the Zulus in a territorial dispute with the Transvaal Boers. The green light was given to start a war with the Zulu Kingdom.
Frere and Shepstone envisaged a quick victory over the Zulus, who would then give them and the Transvaal Boers access to fine grasslands for raising cattle. In addition, the defeated Zulus would become a source of cheap labour for the mines, farms, and railways of the European colonies. The British Army was newly equipped with breech-loading Martini-Henry rifles, while the Zulu warriors had only spears. Frere was, though, "sadly misinformed both about the nature of the Zulu kingdom and the strength of the British troops at his disposal" (Fage, 392).
On 11 December 1878, the British insisted that Cetshwayo disband his army, hand over a number of Zulu warriors accused of entering British territory, pay a fine of 500 cattle, permit Christian missionaries in his territory, and allow the establishment of a British Resident. The alternative would be war. The Zulu king was given 30 days to respond. Cetshwayo ignored the ridiculous ultimatum, as the British expected. What the British did not imagine was that Cetshwayo would manage to galvanise his warriors into a formidable and unified force of men who would fight to the death for their homeland.

Cetshwayo addressed his warriors:
I am sending you out against the whites, who have invaded Zululand and driven away our cattle…You will attack by daylight, as there are enough of you to 'eat it up', and you will march slowly so as not to tire yourselves.
(Pakenham, 64)
Spears v. Bullets
Cetshwayo could call upon 40,000 warriors who lived isolated from the rest of the Zulu community in stockaded villages. The Zulu army on the march, known as an impi, was divided into regiments, each commanded by a general or induna. The principal weapon of the Zulu warrior was an assegai spear, which had a long, thin blade. The assegai's short staff made it ideal as a stabbing weapon. Warriors also carried two or three light throwing spears and sometimes a light club. Protection was provided by a tall and stiffened cowhide shield. Some Zulus had antiquated European rifles and even modern Martini-Henris, but their skill in using them was far inferior to that of the average well-drilled British soldier. Zulu warriors were certainly well-trained in using their traditional weapons. Zulu tactics were rather limited, as indunas almost always favoured a head-on attack on the enemy. Nevertheless, one highly effective Zulu manoeuvre, one that illustrates the high level of organisational training Zulu warriors were given, was the 'Bull's Horns'. This manoeuvre involved enveloping the enemy from two flanks (the 'horns'), drawing them towards the main force, the head or chest of the 'bull', and so completely overwhelming the enemy force.
Lieutenant-General Frederic Thesiger, better known as Lord Chelmsford (1827-1905), was appointed to lead the British expedition into the Zulu Kingdom. Chelmsford had experience of successful campaigns against African armies, notably the Xhosa, and he was given credit for being able to effectively unify an army of many different types of units: professionals and volunteers, British Army, Boer, colonial, and African troops.
Chelmsford's force was composed of 7,000 British Army soldiers, 7,000 African auxiliaries, and 1,000 White volunteer soldiers. The force included local cavalry and 7-pdr field guns. On 11 January, the invaders crossed the Zulu frontier at three different points and headed into unknown territory. Chelmsford's first mistake was to split his force into three independent columns (with a fourth left behind on the Tugela River as a reserve and a fifth to the far north in western Swaziland). On 22 January, Cetshwayo ordered his Zulu warriors to attack the central invading column, since this looked the most threatening. It was the column personally led by Chelmsford. This would be the Battle of Isandlwana, named after the large and peculiar outcrop of rock nearby, which translates from Zulu as either 'Little House' or 'Cow's Stomach'.

The British were armed with rifles and were well-organised, soldiers firing in ranks so that while one line reloaded, another rank fired, thus keeping up a continuous fire on the enemy. These lines of alternately firing troops could be formed into a defensive square, and the tactic proved remarkably successful against a poorly armed enemy. Without the defensive protection of, say, a fortress or trench system, the flaw in the British approach was that no matter how fast men fired their rifles, they could be overwhelmed if the enemy attacked in sufficient numbers. This is exactly what happened as the Zulus put into action their classic 'Bull's Horns' attack.
Attack
On the morning of 22 January, Chelmsford split his column of 4,500 men, leaving around 1,000 riflemen and his cannons at the overnight camp at Isandlwana under the command of Lieutenant-Colonel Henry Pulleine. Chelmsford set off to the southeast with the rest of his column to investigate various unconfirmed sightings of Zulu warriors on the march. One patrol entirely missed 25,000 Zulu warriors hiding in a deep ravine a few miles east of Isandlwana. Meanwhile, a support group of cavalry consisting of 300 African troops under the command of Colonel Anthony Durnford arrived at Isandlwana, as per Chelmsford's orders. On hearing that Chelmsford had marched on and was likely about to engage the Zulus, Durnford rode on with his men to catch up with the general.
At 9:30 a.m., Chelmsford was informed by a dispatch rider that the Zulus had been sighted 'advancing in force' towards the camp at Isandlwana. Convinced the main Zulu army was elsewhere, Chelmsford merely sent a battalion of native Natals to reinforce Isandlwana. Chelmsford also ordered wagons, four of the column's six cannons, and a quantity of tents be brought to him from Isandlwana so that his force might spend the night out in the open. Chelmsford's only precaution was to send spotters with telescopes to a nearby hill to keep Isandlwana under observation. As the morning wore on, these spotters reported nothing untoward back at the Isandlwana camp.

Around 2 p.m., news came to the column of wagons heading towards Chelmsford that Isandlwana was surrounded by Zulus and they should return immediately. The commander of this group, Colonel Harness, intended to do exactly that, but he was countermanded by Chlemsford, who insisted the main Zulu force was elsewhere.
Only the sound of the artillery guns being fired convinced Chlemsford that a battle really was underway at Isandlwana, now some 10 miles (16 km) away. Through telescopes, the General could see fighting, but he remained confident that the 1,000 rifles there would see off an attack without aid. The reality of the situation was first appreciated by Durnford, whose small force could see many thousands of Zulus heading towards Isandlwana. Durnford's force sheltered in a ravine and fought off Zulus until their ammunition ran out.
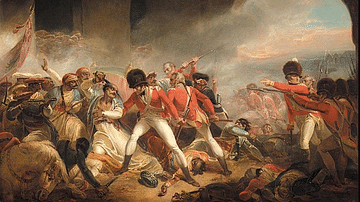
At Isandlwana, five companies of the 1/24th infantry did their best to create a defensive line of ranked riflemen. These men had fought Africans before and were not at first unduly worried, confident that their rifles and well-trained volley fire would help win the day. What they did not imagine was that 25,000 Zulus were fast approaching them. The Zulu 'Bull's Horns' tactic quickly overwhelmed the pathetically short lines of red-coated riflemen. The 'horns' swept either side of the British infantry, who were occupied with the central block of warriors of the Zulu attack. The camp was quickly overrun, a crucial development, since this stopped the supply of ammunition to the front lines.
At this point, many of the non-British African troops deserted while they could still get away. The infantry lines could not now conduct their usual orderly retreat while maintaining fire on the enemy, since the camp behind them was already devastated, and they were running out of ammunition. The two cannons had already been overwhelmed. The British soldiers were now obliged to fight in a defensive infantry square or in smaller isolated groups, men standing back-to-back to protect themselves from Zulu attacks on all sides. When their ammunition ran out, the men stabbed with their bayonets, but these pockets were swiftly overwhelmed and annihilated.

There were very few survivors of the chaotic retreat back to Natal. One of these, Horace Smith-Dorrien, describes the Zulu attack on Isandlwana:
Before we knew where we were, they came right into the camp, assegaing everyone right and left…The enemy were going at a kind of very fast half-walk and half-run. On looking round we saw we were completely surrounded…I had lots of marvellous escapes, and was firing away at them with my revolver as I galloped along. The ground there down to the river was so broken that the Zulus went as fast as the horses, and kept killing all the way…I gave up all hope, as the Zulus were all round me, finishing off the wounded…I rushed off on foot and plunged into the river, which was little better than a roaring torrent…I was being carried down the stream at a tremendous pace, when a loose horse came by and I got hold of his tail and he landed me safely on the other bank.
(Pakenham, 68).
A brave attempt to save the Queen's Colours of the 1/24th by Lieutenants T. Melville and N. J. A. Coghill was partially successful in that the flag did not fall into enemy hands. Both lieutenants were caught and killed by their pursuers, but the colours were recovered, found a month later in the shallows of the Mzinyathi River.
By around 3 p.m., Chelmsford finally saw fit to return to Isandlwana, but he did not reach the devastated camp until the early evening. The Zulus had gone. As dawn broke, the utter carnage became clear. "Of the 1,700 men who were in the camp on the morning of the 22nd, only 60 whites and 400 blacks survived" (Knight, 54). The fallen had been stripped of their red or blue coats, taken as prizes of war. "In almost every case, the bodies had been mutilated by the Zulus, with the ritual slash across the abdomen" (Pakenham, 70). This slashing was, in fact, done in the Zulu belief that it released a person's soul into the afterlife.
At least 1,000 Zulus died at Isandlwana, a heavy price for victory. The tactic of charging an enemy equipped with rifles was fatally flawed, but the sheer courage and numbers of Zulu warriors, the relatively open ground, and the insufficient ammunition distributed to the British soldiers meant that the Zulus scored a famous victory and inflicted a notorious defeat on the mighty British Empire.

Epilogue: Rorke's Drift
Immediately after victory at Isandlwana, 3-4 thousand Zulu warriors attacked a small British force at the nearby mission station called Rorke's Drift. This attack was against Cetshwayo's orders because it involved crossing the frontier into British Natal. In the curious selectiveness of history, it is this episode, and not the disaster of Isandlwana, which has enjoyed lasting fame in British culture, largely thanks to the 1964 film Zulu, which tells its dramatic story.
At Rorke's Drift, just 139 men of the Welsh 24th Regiment held off an attack which lasted more than 24 hours, all the more remarkable a feat since a good number of the men were invalids. Accounting for over 500 Zulu warriors in an assault which lasted 12 hours, the defenders won the respect of the attackers, who were already fatigued after their assault on the British at Isandlwana and who were completely without supplies. When Chelmsford's retreating column arrived at Rorke's Drift the next day, the 23rd, the fires of the mission buildings were still smouldering. If anything, the survival of Rorke's Drift's defenders showed the advantageous combination of rifles and walled defences that had been so sorely lacking at Isandlwana.
The Anglo-Zulu War
Shepstone and Frere suffered career setbacks after the Isandlwana debacle; Shepstone lost his son in the battle. The new commander-in-chief of British forces in South Africa was General Sir Garnet Wolseley, a methodical man charged with reversing the dishonour and winning the Anglo-Zulu War both quickly and decisively. However, in the time it took Wolseley to actually arrive in Southern Africa, Chelmsford ignored orders and continued the war with the Zulus.

In reality, the Zulu victory at Isandlwana was the beginning of a war the Zulus could not win, faced as they were with a technologically superior enemy. Although 1,000 rifles and 400,000 rounds of ammunition were captured at Isandlwana, learning how to shoot them was another matter. The British returned in force and this time brought their Maxim machine guns. The bulk of the Zulu army was destroyed at the Battle of Ulundi on 4 July 1879, and Lord Chelmsford rescued his reputation. On 31 August, Cetshwayo was captured and sent into exile. The Zulu Kingdom was divided into 13 rulerships, which were then, unsurprisingly, beset by factional infighting. Even the reinstatement of Cetshwayo in 1883 could not resolve the crisis. Zululand became a crown colony in 1887 and was absorbed into Natal in 1897.
An official enquiry into the Isandlwana debacle criticised Chelmsford's conduct of the initial expedition into the Zulu Kingdom, and he never served in a major campaign again. In his defence, Chelmsford noted that he had not intended to stay at Isandlwana for any length of time, and because the ground was stony, he thought the creation of defensive trenches an unnecessary burden on his tired men. Further, the camp could not be approached with any degree of surprise, given the open plain. Neither could the wagons have been drawn into a defensive laager, since they were needed to ferry supplies from the day's previous camp. In other words, the British had not lost the battle; the Zulus had won it.
The Anglo-Zulu War set the whole of Southern Africa into motion. British expansion continued at the expense of both Africans and Boers. The Union of South Africa was formed in 1910, unifying the Cape Colony, Natal, Transvaal, and Orange Free State into a single, if troubled and culturally divided colony.