Immediately after their famous victory over the British at the Battle of Isandlwana on 22 January 1879, as many as 4,000 Zulu warriors pushed on across the Zulu-Natal border. This Zulu army headed for Rorke's Drift, some 12 miles (19 km) away. Here was a mission station and 140 soldiers of the 24th Warwickshire Regiment and allied troops. A siege battle lasted 12 hours, but the defenders held on, all the more remarkable a feat since a good number of the men were invalids even before the battle started. Eleven Victoria Cross medals were awarded for the successful defence of Rorke's Drift.

Causes of the Anglo-Zulu War
Britain controlled the Cape Colony in Southern Africa, which was strategically important because the Cape of Good Hope was a stopping point for ships that connected India and the Far East to Europe. Through the 1830s, when the British outlawed slavery and population growth applied too much pressure to land and resources, around 14,000 Boers (White settlers of Dutch or French ancestry) migrated northwards. The Boers fought both the Ndebele and Zulu peoples to carve out two new territories for themselves: Transvaal and Orange Free State. In 1854, the British recognised these two Boer republics in return for their acknowledgement that they were, theoretically, under British sovereignty. Another British colony was Natal, located along the Indian Ocean coast and created in 1843.
This rather poor corner of the British Empire suddenly became one of the richest when diamonds were discovered in Griqualand in the late 1860s, which was made a crown colony in 1871. The British, particularly the new Colonial Secretary Sir Michael Hicks Beach, were keen to unify the British colonies with the two Boer republics into some sort of federation. Meanwhile, certain African groups were making their last desperate attempt to rid themselves of the colonists. A loss by the Boers to a Pedi attack gave the British the excuse to annex Transvaal in January 1877 and then claim that only a British military presence would guarantee security. The British were still determined to create their federation of Southern Africa, but one serious obstacle remained to the north of Natal: the Zulu Kingdom.
The Zulu people were originally one clan of the Nguni people who had migrated down into Southern Africa in the 16th century. By the 1820s, the Zulus had built themselves an empire based on a martial culture. The king of the Zulus since 1872 was Chief Cetshwayo kaMpande. The British were wary of a well-organised state with 40,000 warriors so close to their frontiers, but the Zulus had, in fact, shown no signs of hostility to their European neighbours. Both Sir Bartle Frere, governor of the Cape Colony, and Theophilus Shepstone, a key figure in the government of Natal, were keen to hold on to Transvaal, and the bordering Zulu kingdom was seen as a threat to that aim. In addition, the Zulus possessed fine grasslands for cattle grazing, and if they were conquered, this would provide a new supply of labour for the region's railways and mines. False reports exaggerating the Zulu threat to British interests were sent to London, and so the green light was given for yet another colonial war. An ultimatum was sent to Cetshwayo in December 1878, essentially a demand to give up sovereignty, which the Zulu king understandably refused.

The Disaster at Isandlwana
Lieutenant-General Frederic Thesiger, better known as Lord Chelmsford (1827-1905), was appointed to lead the British expedition into the Zulu Kingdom. On 11 January, the invaders crossed the Zulu frontier at three different points and headed into unknown territory. Chelmsford's first mistake was to split his force into independent columns. On 22 January, Cetshwayo ordered his Zulu warriors to attack the camp of the central invading column, since this looked the most threatening. It was the column personally led by Chelmsford.
Over 25,000 Zulu warriors attacked and destroyed the British camp below the Isandlwana mountain. "Of the 1,700 men who were in the camp on the morning of the 22nd, only 60 whites and 400 blacks survived" (Knight, 54). Chelmsford, who had been out scouting for the enemy, returned to his devastated camp at dusk. The Zulus had gone, but on the horizon, in the direction of the mission station at Rorke's Drift, some 10 miles (16 km) away, was the glow of fires. The mission station, located at a crossing point of the Buffalo River, had clearly been attacked as well.
The Mission Station
The attack on Rorke's Drift was against Cetshwayo's orders because it involved crossing the frontier into British Natal. Nevertheless, with their blood up after Isandlwana, as many as 4,000 Zulu warriors headed directly for the mission station. These three Zulu regiments had not been directly involved in attacking the camp at Isandlwana, but they had chased and rounded up any men fleeing that camp. Some of these fugitives had reached Rorke's Drift and so warned the men there of the disaster a few hours earlier and the strong possibility of a Zulu attack on the mission.

The defence of Rorke's Drift was in the hands of B Company of the 2/24th Regiment. In command was Lieutenant John Chard of No 5 Field Company of the Royal Engineers, who had seniority over Lieutenant Gonville Bromhead of the 2/24th Warwickshire Regiment. The force included 81 British Army infantry and native troops from Natal. Chard decided to stay and defend the mission. As Assistant Commissary James Dalton of the Commissariat and Transport Department pointed out, moving the wounded from the hospital onto wagons would create a slow-moving column, which the Zulus would then surely catch in the open.
The men, who had about one hour before the Zulus turned up, fortified the mission as best they could. The storehouse and the hospital building were converted into strongholds with loopholes made in the walls. Crude defensive walls were built connecting the buildings using whatever was available, principally bags of mealie (maize), crates of tinned meat, and large biscuit boxes, of which there were fortunately plenty left over from Chelmsford's use of Rorke's Drift as a camp for his column the night before it had entered Zululand. A redoubt was built near the storehouse in case the outer walls were breached.
When the first Zulus were spotted on the horizon, Otto Witt, the Swedish missionary whose station it was, left to rejoin his family on his farm. A group of mounted native African troops and the Natal Native Contingent also left the mission. The rest of the men settled behind their defences and waited to see what would happen next.

The principal weapon of the Zulu warrior was an assegai spear, which had a long, thin blade. The assegai's short staff made it ideal as a stabbing weapon. Warriors also carried two or three light throwing spears and sometimes a light club. Protection was provided by a tall and stiffened cowhide shield. Some Zulus had antiquated European rifles and even modern Martini-Henris, but their skill in using them was far inferior to that of the average well-drilled British soldiers, who could not only fire accurately but do so in ranks so that while one line reloaded, another rank fired, thus keeping up a continuous and devastating volley fire on the enemy.
The Zulus Attack
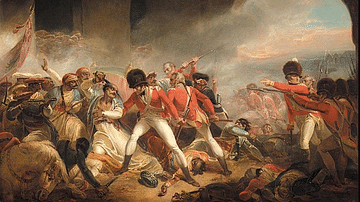
In the afternoon, perhaps around 4 p.m., the Zulus launched their attack, concentrating on two fronts: one on the north side of the station and the other on the western side of the hospital building. Those Zulus who had rifles took up high ground on the slopes of the nearby hill, Oskaberg. Wave after wave of Zulus rushed the defensive walls where they were lowest. The Zulu general, Prince Dabulamanzi KaMpande, half-brother of Cetshwayo, struggled to instil discipline, since his men, after missing out on the main attack at Isandlwana, were desperate to win glory for themselves. For this reason, Dabulamanzi was unable to create a reserve or even limit the attacks. Nevertheless, the courage and sheer numbers of the Zulu attackers began to take their toll on the defenders. Even the poor shots of the riflemen on Oskaberg were eventually able to impose some losses on the British.
By 6 p.m., Chard was obliged to have his men retreat from the outer wall near the hospital and create a shorter defensive line behind a newly erected wall. The hospital building was also abandoned as the Zulus took it over room by room. Soldiers and patients, digging holes through successive interior walls, helped each other out of the building and then across the yard to the greater safety of the high walls built around the storehouse. The Zulus set alight the thatched roof of the hospital but were driven back by the concentrated fire from the storehouse. The British wounded helped distribute ammunition to the men firing from the walls.
As the attacks continued, Chard had an even smaller redoubt built within the existing one. Colour-Sergeant Bourne describes the courage of the Zulus who threw themselves at the defences in the face of rifle fire: "[The Zulus] show their fearlessness and their contempt for red coats and small numbers…[they] tried to leap the parapet, and at times seized our bayonets, only to be shot down." (James, 257).

The British held out against these repeated attacks until midnight, when the Zulus, themselves in desperate need of rest, began to reduce the frequency of their charges. Most of the attackers had not eaten or rested since the morning of the day before. There was also the problem that just getting to the walls was seriously hampered by the number of dead bodies on the battlefield. Sporadic attacks came over the next few hours, and the fire from the hillside never stopped, especially now that the defenders were backlit by the burning hospital building. Around 4 a.m., the attackers finally withdrew. The defenders were not convinced this was the end of the battle, a suspicion confirmed when the Zulu army reappeared on the slopes of Oskaberg at around 7 a.m. However, this was, to everyone's immense relief, merely a manoeuvre as they headed east and back across the Buffalo River to Zululand.
The assault had lasted 12 hours. Up to 500 Zulus had died in the failed attempt to take the mission station, and perhaps another 500 more were wounded. Amongst the defenders, only 17 men were killed, but almost all of the survivors were wounded in one way or another. When Chelmsford's retreating column arrived at Rorke's Drift later that morning, the fires of the mission buildings were still smouldering. If anything, the survival of Rorke's Drift's defenders showed the advantageous combination of rifles and walled defences that had been so sorely lacking at Isandlwana. Eleven Victoria Crosses, Britain's highest military honour, were awarded to the defenders of Rorke's Drift, including to Chard and Bromhead. In addition, five Distinguished Conduct Medals were awarded.
Aftermath
In reality, the battles at Isandlwana and Rorke's Drift were merely the opening overtures of a larger war that the Zulus could not win, faced as they were with a technologically superior enemy. The Zulu losses at Isandlwana and Rorke's Drift were unsustainable. As Cetshwayo himself said, "An assegai has been plunged into the belly of the Zulu nation" (McBride, 22). The British returned in force to Zululand, and this time, they brought their machine guns. The bulk of the Zulu army was destroyed at the Battle of Ulundi on 4 July 1879. On 31 August, Cetshwayo was captured and sent into exile. The Zulu Kingdom was then divided into 13 rulerships. Zululand became a crown colony in 1887 and was absorbed into Natal in 1897.
The debacle at Isandlwana was avenged but then forgotten. In contrast, the episode at Rorke's Drift, a mere footnote to the Anglo-Zulu War, has enjoyed lasting fame in British culture, largely thanks to the 1964 film Zulu, which tells its dramatic story with reasonable accuracy. Naturally, too, cultures prefer to remember their victories rather than their defeats.